Hardware
Receipt Thermal Printers
Thermal printers are widely used in restaurants, cafes, bars etc. also in POS systems and according to the statistics, printers does frequently make a lot of problems to restaurant staff.
But if we pay attention to the instructions of using a receipt printer, we'll find that it is extremely easy to use and it does work quite reliable, although we must follow some basic rules while using it. In most cases, restaurants use printers with 80mm thermal paper. These printers are usually powered by 24 V standard Adapters.
Printer Manufacturers
In Georgia, you may find different kinds of printers. For example:
EPSON
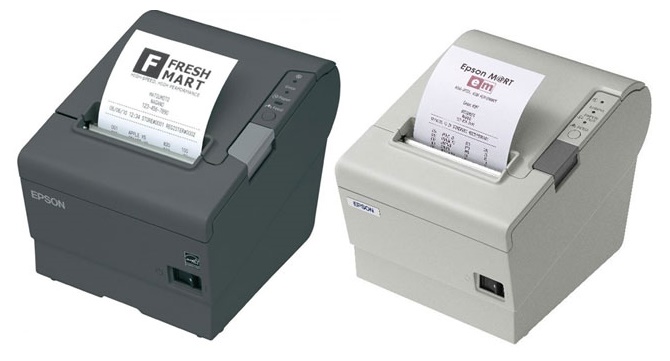 Epson has very good, reliable printers (maybe the best) but quite expensive (400-960 GEL - defends on model). Although it has some functional limitations - usually has only one type of port. Therefore bar printer may not be able to work in the kitchen, and vice versa; It doesn't have so-called beeper (or at least not that I'm aware of) - that means it won't give you a signal when a receipt is being printed. It's a very important thing for a cook, which is doing his job and may not be able to notice a new order receipt.
TYSSO
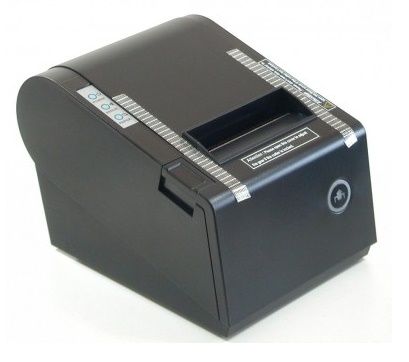 These are very widespread printers. They usually have a variety of ports - for working on different conditions and different distances from the server. The PRP-085 model was so popular that the other companies began producing printers with the same architecture. It costs about 400 lari printers in Georgia.
BIRCH
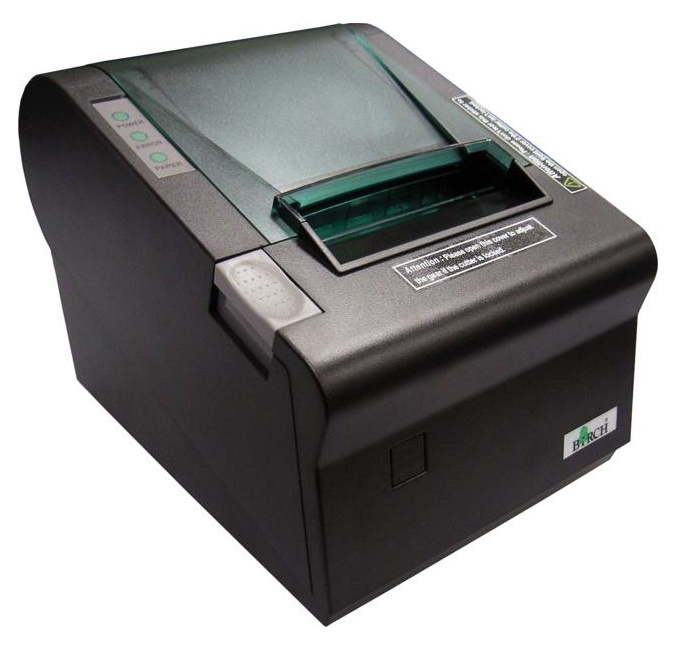 The recent time BP-003 model became popular (Although, you may find older models made with BRP-085 architecture). Usually has two ports (e.g. USB & LAN - designed to work 1.5m & 40m or 1.5m & 150m away from server) and it's characterized by middle reliability. It costs about 400 Lari in Georgia.
SCANGLE
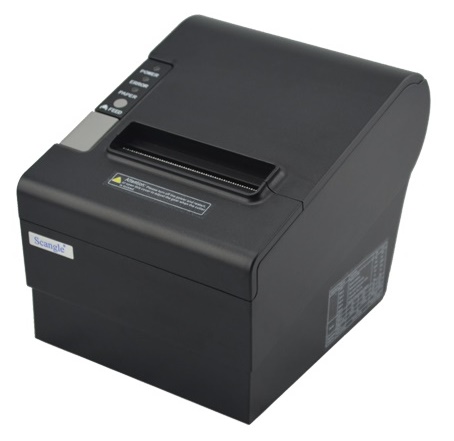 The printers of the firm Shenzhen City Scangle Technology Co., Ltd. has recently become widespread. As compared to Epson, these printers are characterized by less reliability, but it is very convenient to use because it has different types of ports (the one and the same printer can be used on a different (1.5m, 40m, 150m) distance from the server. You can freely move it from bar to the kitchen or any other place.). It also has a beeper and costs 340-380 Lari in Georgia. SGT-802 is a very popular printer of Scangle.
Printer Ports
Printers are connected with computers (or print servers) via ports. Ports are of different types and they're characterized by different properties. There are 4 main types of ports:
LPT port (paralel port)
LPT was specially made for printers. There are realized different types of this port in computer technologies. These kinds of ports are characterized by high speed and the highest reliability. Designed for working 1.5 – 3 meters away from PC. You may find about 20 meters long LPT cables, but they are usually characterized by less reliability.
That's how the LPT port looks on PC: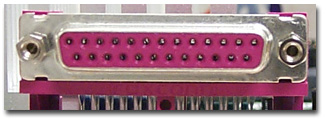
And how it looks on a printer: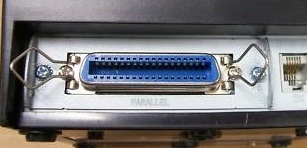
LPT port was often used before. Now it's rarely used and considered to be obsolete. However, merchants are still frequently using it. It can be said that users can not abandon the agility, simplicity and reliability of this port.
COM port (serial port)
Complies with so-called RS-232 standard and it's one of the oldest. But it's still widely used in trading facilities due to its cheap price and reliability.
distance is not recommended for this type of port). COM works on less distance than LAN (which does work 150 meters away from server/switch if there are no obstructions such as inductive or electromagnetic signals). Also, COM printer works approximately 5 times slower than LAN, but COM is much simpler and reliable in comparison with LAN. COM port signal is much stable to electronic noise than LAN. Sometimes it's necessary to have a specialist to constantly watch over the LAN printer, which is always a huge problem in restaurants. Therefore, if there's an opportunity, a COM connection may be ideal for a kitchen printer.
That's how COM port input looks on computer:
And it looks like this on a printer: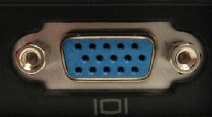
Or like this:
USB (Universal Serial Bus)
It's the most popular port and well known to everyone.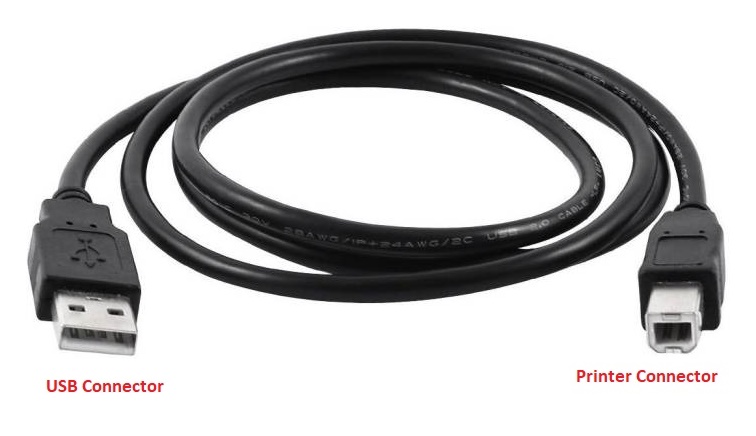
USB is characterized by cheapness and high speed, although it shows less reliability if we use it for printers. USB input on a printer looks like this: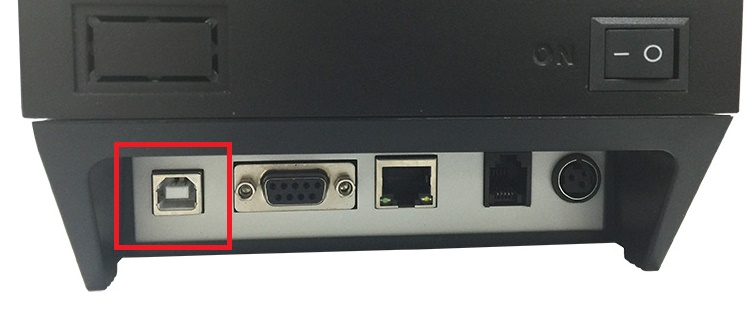
Note that USB connection gives you the ability to use a printer which is only 1.5 - 3 meters away from the computer. USB is not designed to connect a printer (or any other device) which is 3 meters further away from the PC. Therefore a USB printer, usually, isn't suitable for the kitchen. It's not recommended to use more than 1 USB printer on the restaurant server, otherwise, a specialist may be needed in order to make all the printers work correctly.
LAN port (local area network).
Using this kind of port printer can be connected to the computer via a switch. LAN input looks like this: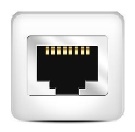
Note that receipt printer does almost always have a cash drawer input, which is visually similar to LAN input: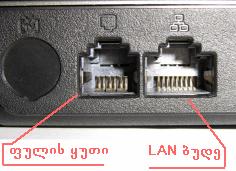
LAN input has 8 contacts and it's wider than cash drawer input, which has 6 contacts and is a bit narrow. Therefore if you pay close attention, do won't make a mistake. It's physically impossible to connect LAN cable into cash drawer input, because LAN cable is wider than cash drawer input. However, it's (physically) possible to connect cash drawer cable in LAN input, but it won't give you any result - cash drawer doesn't work with LAN.
A printer which uses a LAN connection works fast and can be placed at a long distance from the server (or switch). But it's important to note, that this kind of connection needs an IT specialist.
As already mentioned, we must protect a few basic rules while using a thermal printer. First of all, it's necessary for the PC system, with which the printer is connected, to be planned correctly. You need to properly choose printer type and computer. We strongly recommend not to use notebooks for receipt printing purposes. Practice shows it is a very unreliable solution. Notebooks' architecture, as usual, isn't designed for working in restaurants as servers because of the high load from printers and restaurant software. For printing purposes, you should use a stationary PC specially designed for this function with high-quality chipset. The optimal variant is the following: Asus motherboard with Intel processor & chipset. Practices showed that the USB printer is the most popular for it's cheapness and easyness. But there are a few important things about USB printers.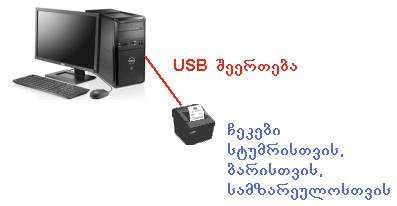
USB might be the best solution for 1PC+1printer system - for small cafes & restaurants, when the same printer is being used for printing receipt of guests', bar and kitchen. If the system is a bit difficult and there are more than one printer needed, it may look like this:
As you see, a USB printer is defined as a local printer and the second is COM or LAN printer which can be placed 3 meters (or more) further from the server. If a remote printer exists sometimes USB is being used as a shared printer. Such connections may schematically imagine as in the following picture:
As you can see there are two computers shown in the above example - server and POS terminal. Both computers are connected with 2 separate USB printers. It's theoretically absolutely acceptable scheme, but as practices showed this kind of scheme is not enough reliable. A command about printing a kitchen receipt is usually sent by a server to the printer (in some software the function of printing is performed by a server itself), but finally a connection is being established between the kitchen printer and another computer - in this case, POS terminal. The scheme looks unreliable. 2 USB printers won't be the best solution, we need a different scheme. one example is given below: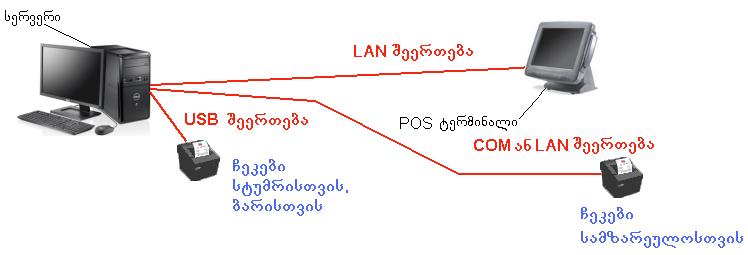
Thermal Paper
In most cases, POS thermal printers require 80mm thermal paper rolls (but sometimes other sizes are used too). There's an instruction in all printer documentation about how to put a thermal paper inside a printer.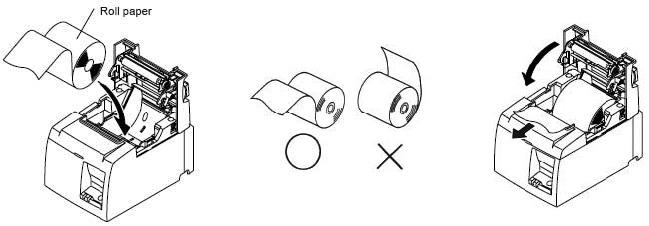
The roll should be put in printer with the open side up (as shown above), because thermal printers have only one thermosensitive side and if you put it upside down it won't print but gives you a blank paper.
self-test
In order to check the printer status, you should learn how to test it. Generally, there are two ways of testing a printer - self-test and test from the printer properties window. self-test is the main test of a printer. It can be performed automatically - without a computer. This way we make sure that the printer is working (there's no damage with it) and it will print out the properties.
In order to run self-test, one should turn off the printer, then push the button called "Paper Feed" and hold it, While "Paper Feed" is pressed one should push the power button.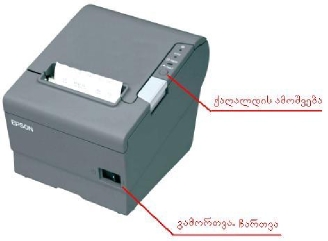
The printer turns on and little light diodes blink on the panel (some printers might give you beep signals instead of diode lights) and then the "Paper Feed" button should be released. If everything's fine with the printer (it's not damaged and thermal paper is inside it), the self-test will be printed out. The example is given below:
If you failed the first time try to test it again. The printer must be able to print self-test, if it doesn't the hardware might be harmed. If the printer is damaged we have one of the following pictures:
- we hear continuous or intermittent beep signals.
- the printer doesn't react when "Paper Feed" is pressed.
- we see an error light on the printer panel and it doesn't disappear.
There are differences between printers and the buttons ("On/Off" "Paper Feed") are placed differently:
but these buttons are ordinary for all printers and all of them definitely have it.
Thermal Printers in The Operating System
Thermal printers (just like any other printers) need a driver to be installed on the computer. After the installation we can see the printer in the control panel: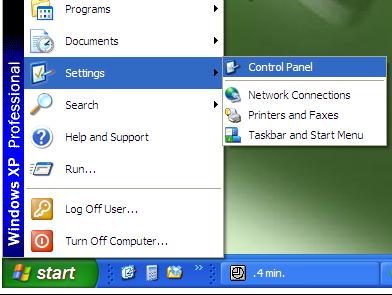
Choose "Printers & Faxes":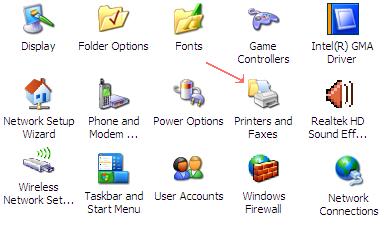
Sometimes there are many printers installed on the system as we see in the example: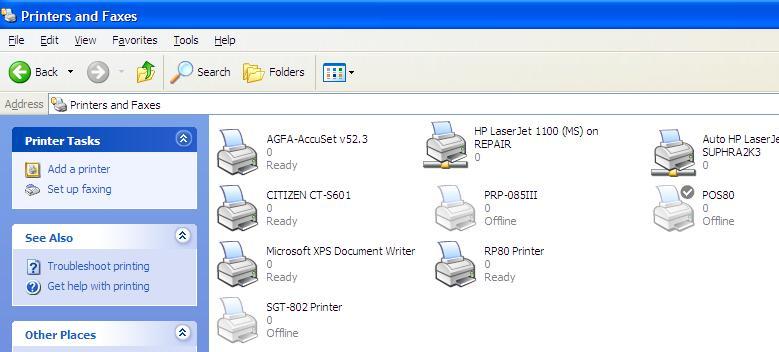
In the picture above the printer (POS80) has a grey sign with a white checkmark, which daws the administrator's attention. Note that in this case, it doesn't mean anything for us, for the users of "Suphra". Pay attention to the following: On the above example there are some printers ready to use, some aren't. If the printer is ready it may look like this:
The icon with the text "Ready" shows your printer to be ready. If you pay close attention you'll find, that the icon consists of three parts:
Here you can find:
- Printer name - RP80 Printer (you can rename as "Printer BAR" or something else);
- The number of documents in the queue (0 in this case) - this number shows how many documents are going to be printed out. In order to be ready for printing the queue must be clean, it's necessary documents not to be stuck in the queue.
If a document is stuck and can't be printed, this prevents other documents from printing. Therefore in this case we should erase the queue. Here's how to do it:
Right-click on the icon and click "Cancel All Documents".
Printer status - this parameter describes the status of the printer (whether it is ready to print or not). In normal condition, the printer status must be "Ready". Any other status (Offline, Error etc.) means that the printer is not ready to print.
Keep in mind that you may not be able to see the status or number of queued documents due to the changed view style of the Control Panel. In this case, you can hover the printer icon (as shown below) to see it's properties: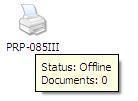
Or set the Views style to "Details".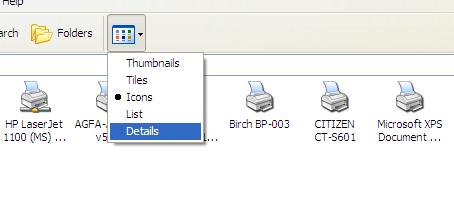 That's it now you can see detailed information of all printers:
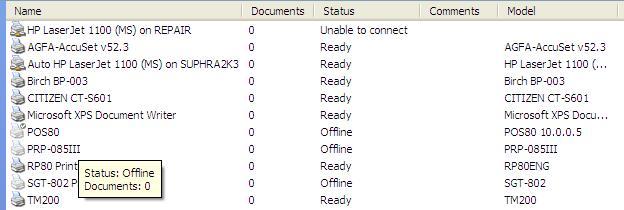 We discussed the self-test above, now let's talk about testing a printer from PC.
Testing Printer From PC
If a printer has no physical damage, the driver is installed and it can perform a self-test the printer must print a test page from the PC too. In order to print a test page right-click on the desired printer and we'll see the window like this: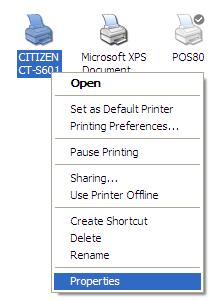 Choose the "Properties" tab as shown on the picture. This way we open the properties window of the printer called "CITIZEN CT-S601":
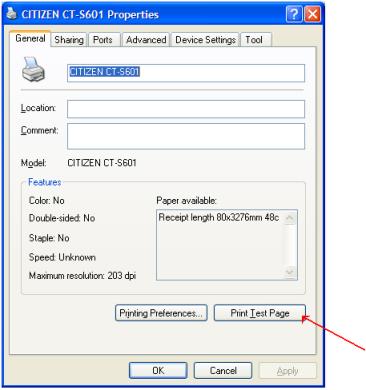 From this window you can print the self page if you press the button "Print Test Page" (if everything's OK with the printer and it's properly connected with the PC) and the test page will be printed out, which looks approximately like this:
The content of the page may vary in different cases. In almost every case the text starts with the following: "Congratulations! If you can read this information, you have correctly installed your ..." etc. Printing this page means the printer works correctly on Windows. Note: You see the window (with buttons "OK" and "Troubleshoot") even if the printer doesn't print the test page. so this window means nothing.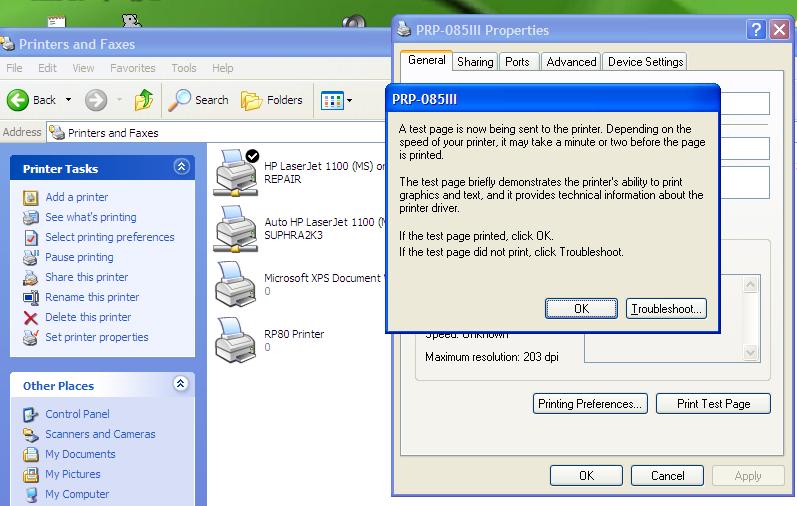 This window gives you a piece of information about what's happening. The print page is being sent to the printer, but it may not perform. If nothing is printed you can go back by pressing on "OK" button.
What's Wrong with Printer? - Hardware Problems
Thus, if a printer can't perform a self-test it's the worst situation. In this case, printer might be damaged physically. The same can be said if the test page shows unrecognisable symbols (printing of unknown symbols may continue infinitely until you press the power off button). Sometimes we hear continuous or intermittent beep signals or see the diode lights blinking while trying to print a self-test (or when we turn the printer on/off). This is not an indication of anything good. In cases like this, there must be damage to the printer's main board.
There may be damage to other parts of the printer such as the engine, paper cutter etc. In short - if there's no ability to print a self-test then the printer is useless.
Sometimes a damaged printer will print partially and the paper has some visual defects. This means that some part of the printer may be broken and needs to be replaced (if it's possible). Sometimes the cutter of the printer cuts wrongly due to cutter or main board damage. Although the printer which has a few visual defects can be used for a while.
What's Wrong with Printer? - Hardware & System Problems
If your printer does a self-test correctly, but can't print a test page from Windows, there may be different reasons that caused this. There are a few well-known cases discussed below.
The Windows OS itself is damaged, or the modules of Windows, which work with printers, are damaged. In this case, non of the installed printers will work correctly. You will have to reinstall OS, reinstall printer drivers, install software Suphra on the PC again and reconnect the printer to software.
There's no printer driver installed on Windows (or it's installed the wrong way). Note that the printer might previously be installed and it was working fine, but later (due to some reason) driver had damaged - "intstallation is broken". The printer must be reinstalled as well as the restaurant software.
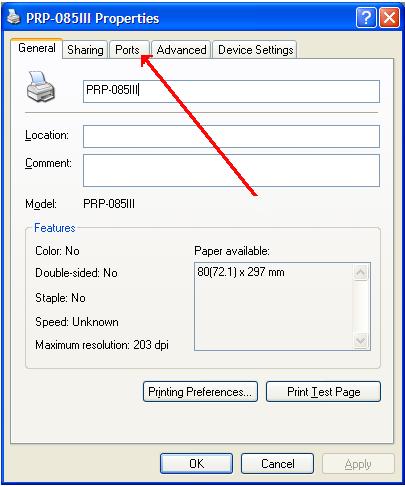
Driver properties of thermal printer need to be reconfigured. Such a situation may occur if the printer cable is plugged into another port, or the properties of the printer (or it's driver) had changed. Typically, there's a situation like this - the USB printer system had been changed and relocated. After the installation, the USB cable had been plugged into another USB input. In this case, there's nothing special to happen, but you will need either to return the cable into its old input and restart the system or to apply changes to the driver properties. In particular, specify another USB port. In order to specify another port, you must open the printer "Properties" window and select the tab "Ports" – as shown in the picture below:
 This will open the "Ports" tab, where we can see something like this:
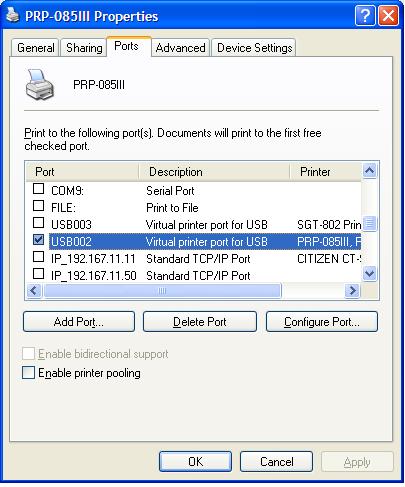 As you can see, there are all the ports shown in this window, which are defined for connecting printers into PC. The printer is currently connected to the port USB002. If you plugged the cable into another USB input, probably you will need to specify another USB port - USB003 (1):
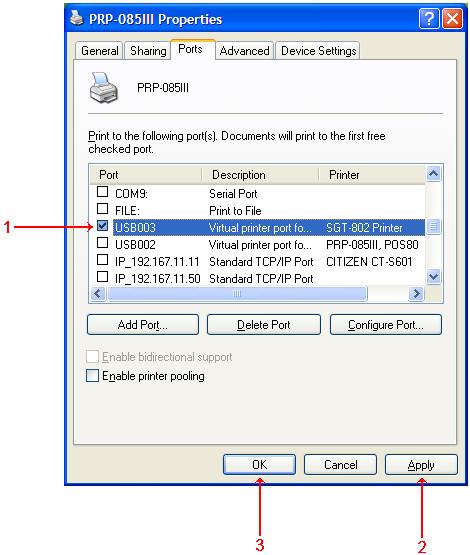 Then press the button "Apply" (2) and OK-ს (3). It's important to mention, that you are able to specify ports for printers from this window. Here you see COM and IP ports. For example, we can change the port of the SGT-802 printer - these printers have 3 types of ports - USB, COM and LAN. In case one of them doesn't work, we can change it into another.
Disability of printer. Printer ports, just like any other computer device, can be disabled from the system. A printer can be disabled from windows "Device Manager" or from BIOS. In this case, you will need to reenable it.
Printer cable problem. The construction of the printer cable depends on the type of port it ends with. Let's see what those (the most widespread) cables (LPT, USB, COM, LAN) look like: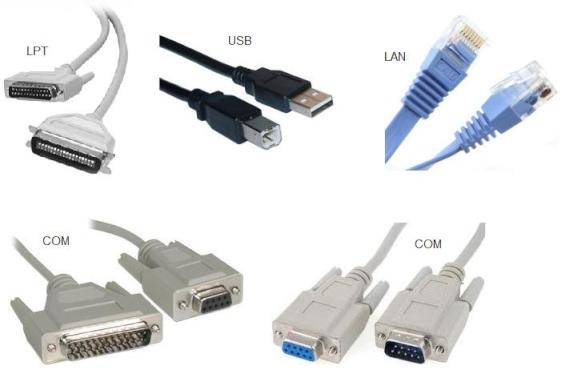
Let's begin with the basic rules - the cable must be connected tightly and reliably in both - PC & printer. If it still doesn't work, then the cable may be damaged.
Cables are often damaged in restaurants. In a case like this, it'll be better to contact the technician, which previously made the system. But if it's not possible, you will need to consider the following: First of all, before you try to recover the damaged cable, you will need to identify the type of the cable.
It's very easy to recover LAN cable, although it's recommended to unplug both sides of the cable. You don't need to power off devices while unplugging a LAN cable. Take into account, that it's important to use high-quality cable made with copper without iron or other substances.
To establish COM connection standard UTP cables are used as usual, (pay attention - you need UTP 5th category, not FTP or SFTP). While recovering COM cable one should definitely power off both computer & printer that is connected to PC. You will need not only to power off those devices but also to unplug them from the power source. Then wait 2-3 minutes and only after that you can begin recovering the cable, otherwise ports may be damaged. Endings of COM cable are connected to inputs via screws and you will need some time to unplug it (Remember, this procedure must be performed only after disconnecting the devices from the power source).
USB cable can be freely connected with the printer and computer without powering them off. Likewise, it can be unplugged from devices that are powered on. But, in case the USB cable is damaged don't try to recover it. It'll be better to replace it with a new one. You may cause serious damage to your devices if you use a repaired USB cable.
LPT connection is the most delicate. LPT cable, as a rule, can't be recovered and it is strongly recommended not to plug or unplug it from devices that are turned on. It's important to mention that this type of connection is more and more rarely used nowadays.
Thermal Printer and Suphra Software
If the printer performs self-test & test from windows, that means there are no problems with connection or/and cables. In this case, if still there is any other problem with printing it must be resolved from "Suphra" software.
PrinterDefine.exe Tool
"Suphra" software has a special utility called "printerDefine", which gives an ability to connect printers to Suphra. This utility can be found at the following address - "C:\DOCTORS".
You can run this utility directly from "supervisor". Click grey printer image in the top left corner of "supervisor".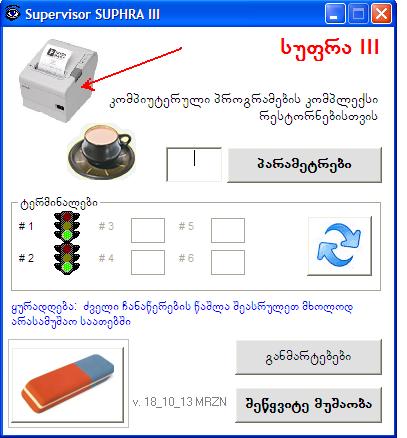 You see the windows of printerDefiner below, which gives you the ability to check the allocation of printers. Let's see which printer is connected to each object (buffet, kitchen bar etc. ). From the same window, you can rearrange printers.
PrinterDefine window looks like this: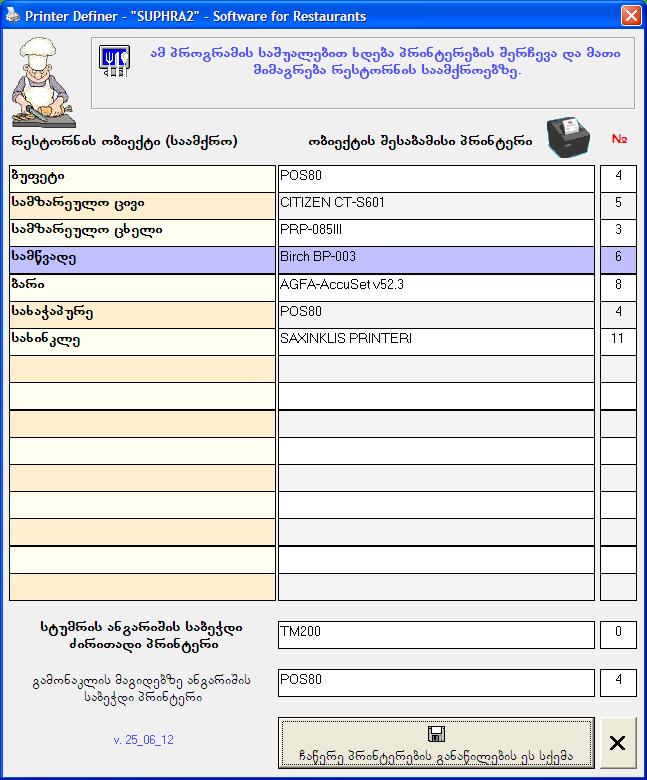 s you see, the following windows consists of three rows. The first row shows all the units of the restaurant (buffet, kitchen, bar etc.), the second row shows the names of printers, and the third - printer system numbers (don't try to change these numbers. They are given to printers by Windows automatically). This table establishes compliance between restaurant objects and printers, which are installed on the system. In particular, the table above shows you:
- The printer "POS80" with number 4 prints both - buffet and bakery orders.
- Kitchen (cold dishes) is connected to "CITIZEN CT-S601" number 5.
- Kitchen (hot dishes) is connected to "PRP-085III" number 3.
- Barbecue place - "Birch BP-003" number 6
- Bar - "AGFA-AccuSet v52.3" - number 8
- The printer dedicated to Khinkali place is called - "SAXINKLIS PRINTERI" number 11
- The printer "TM200" (number 0) or "POS80" (number 4) work for guests' account receipts.
The printers you see in this window can also be found in Control Panel, section "Printers and Faxes".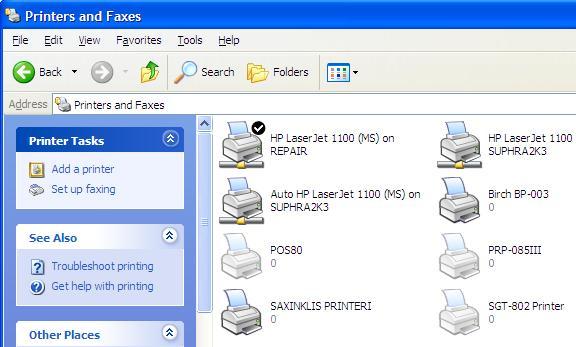 You can change the names of printers (from the window you see above). But, after this kind of change, it's necessary to reconnect printers to the restaurant units (with its new name). Otherwise, the program won't be able to find it.
Unfortunately, sometimes the system can't find the dedicated printer. In this case, the program "supervisor" (which prints guest receipts) or "prn_manager" (which prints internal receipts) may show you pop-up message "The printer you are trying to print from doesn't exist" or "The printer number [e.g. "3"] couldn't be found on the system" or something like this. The same problem may occur when the number of a printer/printers were changed in Windows. This may be caused by installing a new (any kind of) printer on your PC, or if you'll reinstall/uninstall an already installed printer. In a case like this printer numbers are being rearranged in the system.
As result, the bar receipts may be printed out from the kitchen printer or vice versa. Sometimes it's hard to recognize the reason for changing printer numbers in Windows. Fortunately, it's a quite rare case. Although there's an easy solution for this situation - run printerDefine utility and then restart the following programs - supervisor & prn_manager. printerDefine will find & solve problems. You can also shut down your PC (twice) and then turn it on. It will make PrinterNumRestore utility run and fix the printer order.
Redirecting Printers
Sometimes you may need to redirect a printer (e.g to print bakery receipts on the kitchen printer). In order to do this, you will need to run printerDefine utility, double click on the printer name you want to change.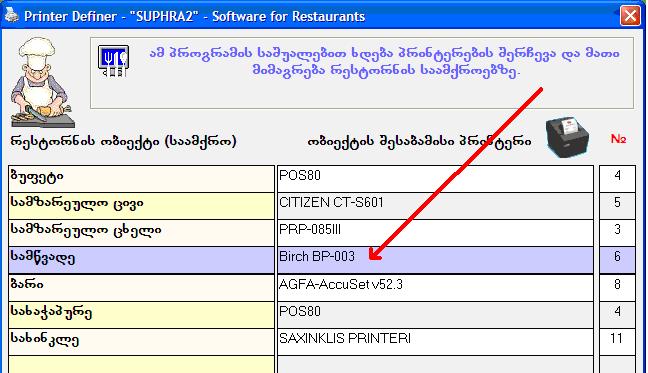 E.g. if we want to change the Barbecue printer we can click the appropriate printer name (Birch BP-003). After that, a little windows will pop up, which suggests printer selection:
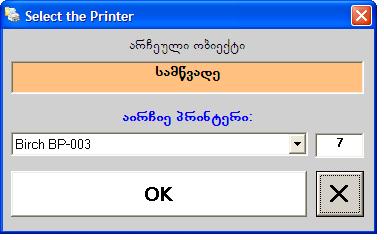
As you can see there's the name of the selected unit (Barbecue) is given in the first field. This object uses the printer named "Birch BP-003". We can drop down (using the select arrow) the list of installed printers and choose another printer, for example, "POS80":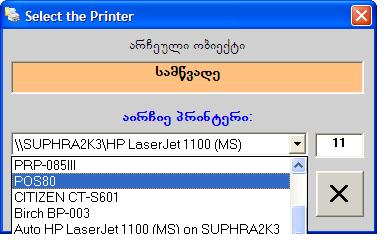 Then we click the "OK" button in order to submit changes and then click "X" to close the window. The printer order will be changed as shown in the picture below. As you see the printer named "POS80" is dedicated to object - Barbecue:
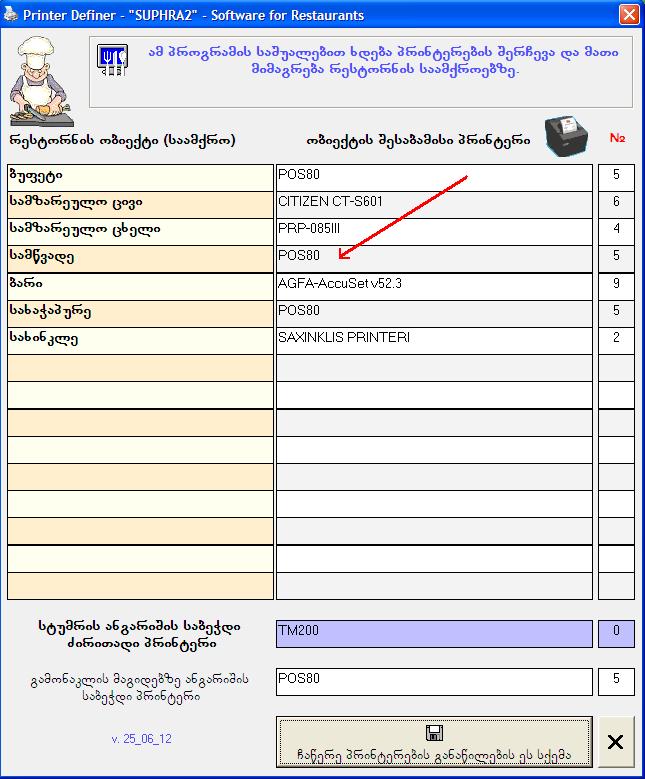 The same way you can redirect any other printer. After making changes you will need to submit new order by clicking on the button "Save new order of printers".
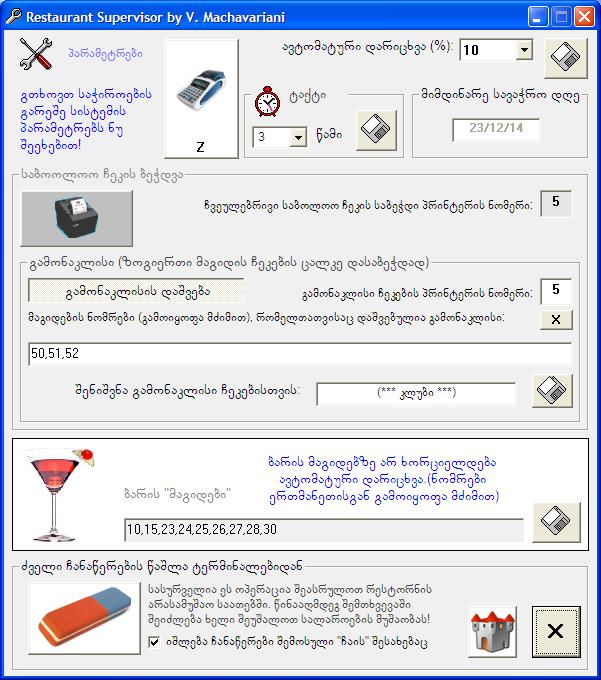
As you see in the picture above, Suphra software gives you the ability to use one printer for printing guests' main receipt and another for exceptional tables. This kind of scheme might be necessary if a restaurant has several halls on different floors, or halls are somehow isolated from each other, or there is more than one cashier in the restaurant. In this case, you must define exceptional tables first.
Exceptional Tables
You can choose a different mode of printing guests' accounts. These orders (when they are printed on kitchen & bar printers) have a predefined note. This may be done using the "supervisor" properties window. Open "supervisor", click "Options". In order to enter the Options window you must type the password and then press "Options":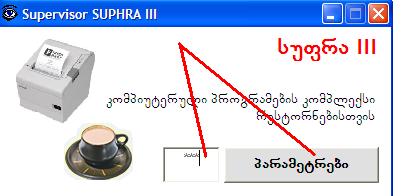 The options windows will appear, which looks like this: